Showing posts with label Blogger Tutorials. Show all posts

Thursday, October 27, 2011

How to fix your glitchy Google Friend Connect (GFC) Followers Widget Box in Blogger

Squee! I am so excited that I found this lovely tutorial from Five Days Five Ways blog. I get so frustrated over my Google Friend Connect (GFC) followers box when it disappears.

It's so glitchy! One minute it's there and then it's gone again UGH! We finally have a solution. Follow these simple steps.

Step 1. Log into Blogger, click on the "Design Tab" then the "Edit HTML" tab.
Step 2. Don’t scroll. Just look for the "</title>" text you see directly above the highlighted text in the screenshot below.
Step 3. Copy and Paste the code below directly after "</title>".
<script src='https://apis.google.com/js/plusone.js' type='text/javascript' />


Wednesday, August 3, 2011

How to Make a Peekaboo Blogger Navbar

I did a post a while back on How to Remove your Blogger Navigation Bar but their is an alternative to just removing it. Follow the steps below on how you can keep your blogger navigation bar so it only appears when you hover over the top of your page.

Be sure to back-up your template before you follow the steps below by click on Download Full Template under "Edit HTML" (or "Backup / Restore Template" if your using the new Blogger in Draft).


Step 1. Log into blogger then click on "Design" (or "Template" if your using the new Blogger in Draft).

Step 2. Click on "Edit HTML" (or "Edit Template" if your using the new Blogger in Draft).

Step 3. Press Ctrl+F to bring up your search filed box then type in
Step 4. Copy the code below and past it right before the code we found above.

#navbar-iframe{opacity:0.0;filter:alpha(Opacity=0)}
#navbar-iframe:hover{opacity:1.0;filter:alpha(Opacity=100, FinishedOpacity=100)}

Step 5. Then save your template.

Monday, June 6, 2011

What Blog Video Tutorials would you like to see?!?!

I am a visual person and I learn best by watching someone do things. I'm thinking of making video tutorials for you. From how to use blogger, installing your own favicon, how to use Feedburner (RSS), plus more but I want to know
is there anything in particular that you would love to see me do?

Tuesday, April 5, 2011

How to Remove Borders from Around the Images you Post

Be sure to back-up your template before you follow the steps below by click on Download Full Template under "Edit HTML".

Step 1. Log into Blogger then click on "Design". 

Step 2. Click on "Edit HTML"

Step 3. Press Ctrl+F to bring up your search field and type in .post img

Step 4. You should see a code that looks like this:

.post img, table.tr-caption-container {
padding: 4px;
border: 1px solid #cccccc;

Step 5. Change the border 1px to 0px.

Step 6. Preview your blog then save.

Saturday, February 5, 2011

How to Add a Copy Code Box for your Button (Video)

Hi Guys! I created a video for you on how to add a copy code box for your button. You can also follow this tutorial by clicking here http://www.amommyssweetblogdesign.com/2011/01/how-to-add-copy-code-box-for-your.html.

The video may be a little hard to see but if you click on YouTube (bottom right-hand side of video) it will take you to YouTube's website and it is better to view.

You are welcome to share this on your blog and I hope you enjoy!!

Friday, January 28, 2011

How to Align and Adjust the Sizes of your Buttons and Images

Ever wonder how someone was able to center a button or image. Maybe you loved the way their blog looked because all their buttons and images were the same size. Here's how to do that and make your blog look organized and together.

I will give you an example for a button in your sidebar.

Step 1:  When you add a button in your sidebar the HTML Code will look something like this:
<a href="http://www.amommyssweetblogdesign.com" target="_blank"><img src="http://i1197.photobucket.com/albums/aa429/mommyssweetthings/A%20Mommys%20Sweet%20Blog%20Design/AnotherDesignButton.png" border="0" alt="Button" /></a>

Step 2:  To have your button centered in the sidebar add the code <center> at the beginning and </center> at the end. It should look like this:
<center><a href="http://www.amommyssweetblogdesign.com" target="_blank"><img src="http://i1197.photobucket.com/albums/aa429/mommyssweetthings/A%20Mommys%20Sweet%20Blog%20Design/AnotherDesignButton.png" border="0" alt="Button" /></a></center>

Step 3:  Now to adjust the size of your button/image you will need to add a code for the height and width.
<center><a href="http://www.amommyssweetblogdesign.com" target="_blank"><img src="http://i1197.photobucket.com/albums/aa429/mommyssweetthings/A%20Mommys%20Sweet%20Blog%20Design/AnotherDesignButton.png" width="100" height="100" border="0" alt="Button" /></a></center>

You can change the width to what ever size you need or like. Change 100 to 125 or 80... whatever works for you!

You can use these same tricks in your posts but you need to be in the "Edit HTML" area. Leave me a comment below if you need more help with this.

How to Schedule your Post to Post Automatically

Sometimes I would like to schedule when my new post will show on my blog at a certain date and time instead of me having to go in and post it manually. Here is how to do that:

Step 1:  After you have created a post click on "Post Options" under "Labels".

Step 2:  Choose "Scheduled at" under "Post date and time". Enter the date and time you would like your post to show on your blog.

Step 3:  Click "Publish Post" and wah la!

Subscribe to our newsletter below so you don't miss tips like this one!

Get instant emails when new templates, buttons and giveaways are going on.
Enter your email address:


Delivered by FeedBurner

Wednesday, January 12, 2011

How to Make Links & Buttons in Blogger or other Websites Open in a New Window

Finally, here is the answer to all your prayers... kidding but seriously! Fot those who know what I am talking about... this code below will allow all your links and buttons to open in a new window without having to do any extra work (meaning - WITHOUT adding the target="_blank" to each and every link). Yay!! The code below will scan your blog for external pages and add the target="_blank" to each and every one of them.

Before you begin please be sure to save a copy of your current HTML Code to your computer first.

Step 1:  Log into Blogger then click on "Design"  >  "Edit HTML"

Step 2:  Press Ctrl+F and find this code </body>. Right before that code copy and paste the following:

<script type="text/javascript" src="http://ajax.googleapis.com/ajax/libs/jquery/1.3.2/jquery.min.js"></script>
<script type="text/javascript">
//<![CDATA[
jQuery('a').each(function() {
    // Let's make external links open in a new window.
    var href = jQuery(this).attr('href');
   
    if (typeof href != 'undefined' && href != "" && (href.indexOf('http://') != -1 || href.indexOf('https://') != -1) && href.indexOf(window.location.hostname) == -1) {
        jQuery(this).attr("target", "_blank");
    }
});
//]]>
</script>


Step 3:  Click "Save Template"

Let me know if it works for you.

View My Portfolio

Monday, January 10, 2011

How to Add a Copy Code Box for your Button

Here is a very simple and easy way to add the copy code box under your Button. The copy code box allows others to use and place your button on their site which will drive more followers/readers to your blog. For an example - take a look at my buttons on the right sidebar. If you would like me to design a button for you just email me AMommysSweetBlogDesign@gmail.com.

*New* There is a video at the bottom of the page on how to do these steps.

Step 1:  Once you have your button created upload it to Photobucket.com.

Step 2:  Click on the HTML code and that will copy it for you.

Step 3:  Log into your Blog and click on "Design" and you should automatically be under the "Page Elements" tab.

Step 4:  Click on "Add a Gadget" then "HTML/Javascript"

Step 5:  Right Click (or press ctrl + v) under the Content area and paste the HTML Code you copied from Photobucket it should look something like this:
<a href="http://YourPhotobucketURLwillBeHere.com" target="_blank"><img src="http://YourPhotobucketButtonImageWillBeHere.png" border="0" alt="Photobucket"></a>


Replace the area in blue (above) with your Website URL.

You can center your button by adding <center> at the beginning of your HTML code and add </center> at the end of you HTML Code.
<center><a href="http://YourPhotobucketURLwillBeHere.com" target="_blank"><img src="http://YourPhotobucketButtonImageWillBeHere.png" border="0" alt="Photobucket"></a></center>

Step 6:  Highlight and Copy your HTML Code again and paste it right under the first one and add <center> plus <textarea> at the beginning of the second HTML Code and add </center> plus </textarea> to the end of the HTML Code. This is what your finished Button with Copy Code will look like.

<center><a href="http://YourPhotobucketURLwillBeHere.com" target="_blank"><img src="http://YourPhotobucketButtonImageWillBeHere.png" border="0" alt="Photobucket"></a></center>

<center><textarea><center><a href="http://YourPhotobucketURLwillBeHere.com" target="_blank"><img src="http://YourPhotobucketButtonImageWillBeHere.png" border="0" alt="Photobucket"></a></center></textarea></center>

Step 7:  Save it and take a look! Leave a comment below and let me know if it works.


Saturday, January 8, 2011

How to Number your Comments

Please Note: be sure to back-up and save your current template to your computer. That way you can go back and reinstall it if you make a mistake. To save your current template click on
"Design" > "Edit HTML" > "Download Full Template"

I have a review and giveaway site and for the longest time I would have to count each comment to find the winner that Random.org chose. I would have on average about 100-200 comments and it got very frustrating when Random.org chose comment #85 or something like that.

Having numbers on my comments was a life-saver so I would like to share how I did it with you.

Step 1:  Log into Blogger and click on "Design" then "Edit HTML"

Step 2:  Put a check mark in the "Expand Widget Templates" box

Step 3:  Press Ctrl+F and find the following code:
<dl id='comments-block'>

If you can't find that code then look for this one:
<dl expr:class='data:post.avatarIndentClass' id='comments-block'>

Step 4:  Right under that line of code, paste the following:
 <script type='text/javascript'>var CommentsCounter=0;</script>

Step 5:  Press Ctrl+F again to find this code:
<b:if cond='data:comment.authorUrl'>

Directly ABOVE that code copy and paste the following:
<br/><span class='numberingcomments' style='float:left;font-size:20px;'><a expr:href='data:comment.url' title='Comment Link'><script type='text/javascript'>CommentsCounter=CommentsCounter+1;document.write(CommentsCounter)</script></a></span><br/>

Step 6:  Click "Save Template"

How to Remove the Blogger Navigation Bar

Please Note: be sure to back-up and save your current template to your computer. That way you can go back and reinstall it if you make a mistake. To save your current template click on
"Design"  > "Edit HTML"  > "Download Full Template"

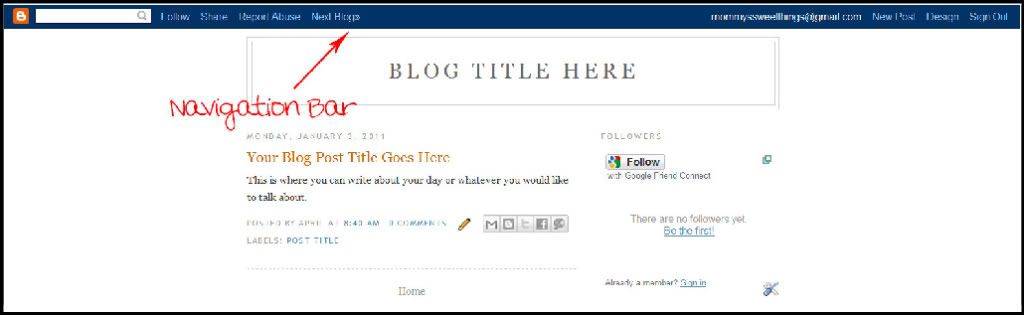
The Blogger Navigation Bar is the blue bar that sits at the very top of your blog. It can be an eyesore to your beautiful blog design. Here are 4 easy steps to remove it.

A Mommy's Sweet Blog Design

Step 1:  Log into Blogger and click on "Design"  then  "Edit HTML".

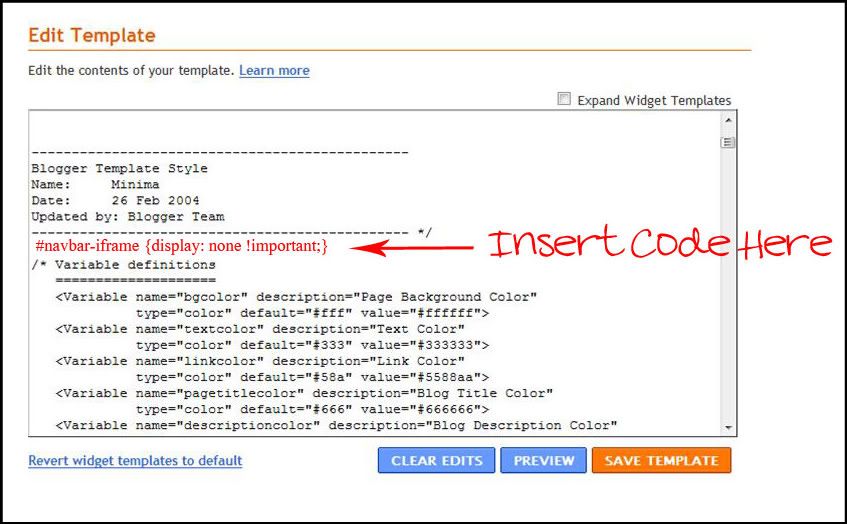
Step 2:  Highlight and Copy this code:
#navbar-iframe {display: none !important;}

A Mommy's Sweet Blog Design

Step 3:  Insert the code right above   /* Variable definitions

Step 4:  Click "Preview" to make sure it's gone then click "Save Template"

ShareThis

Blog Hops Everyday Blog Hops Everyday
Related Posts Plugin for WordPress, Blogger...